Thoraco-Lumbar Junction Flexibility
This standing rotation exercise loosens the thoraco-lumbar junction, a frequently stiff transition zone between the thorax and lumbar spine.

Thoraco-Lumbar Junction Flexibility
The thoraco-lumbar junction is the transition zone between the thoracic spine and the lumbar spine, located approximately at vertebrae T12-L1. It is a major point of mechanical stress because movement constraints change dramatically here: the thoracic spine is relatively rigid (stabilized by the ribs) while the lumbar spine is highly mobile. This gentle rotation exercise loosens this critical zone.
Why Loosen This Zone?
A stiff thoraco-lumbar junction is an overlooked cause of pain in the lower back and between the shoulder blades. When this zone lacks mobility, the lower lumbar vertebrae compensate by becoming hypermobile, accelerating their wear. Conversely, the thoracic region can lock up, causing rib or intercostal pain. Loosening the thoraco-lumbar junction restores harmonious movement throughout the spine.
Anatomy Involved
- Vertebrae T11, T12, L1, L2 — the transition vertebrae, where facet joint orientation changes.
- Paravertebral muscles — the erector spinae and multifidus in this zone are specifically mobilized.
- Oblique muscles (internal and external) — the primary trunk rotators, actively engaged in this exercise.
- Quadratus lumborum — a deep muscle connecting the last rib to the pelvis, often responsible for pain at this junction.
- Diaphragm — its crura insert on the lumbar vertebrae and influence the zone's mobility.
Step-by-Step Instructions
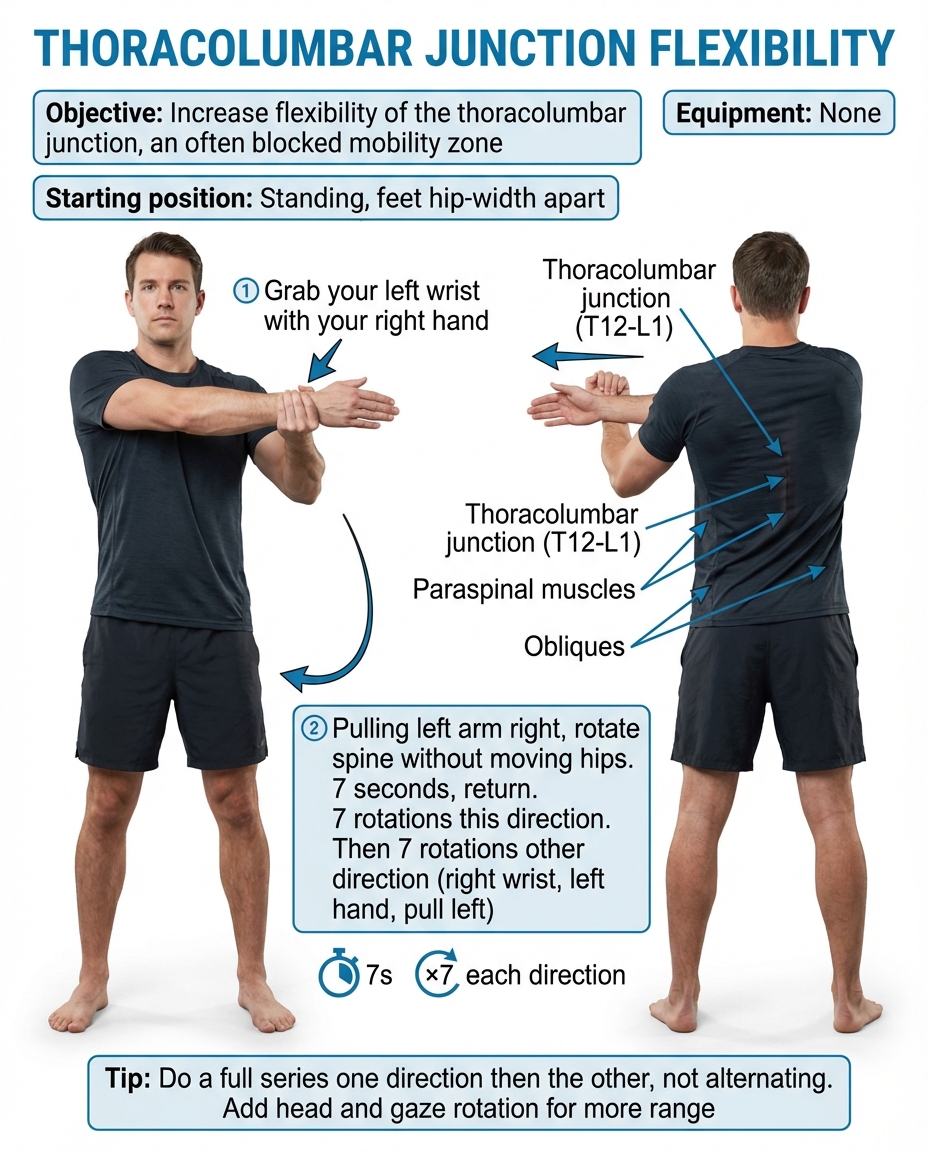
Step 1 — Starting Position
Stand with feet shoulder-width apart, knees very slightly bent. The pelvis stays fixed, facing forward throughout the exercise. This is the key: only the upper trunk rotates.
Step 2 — Wrist Grip
Raise your arms in front of you at chest height. Grasp your left wrist with your right hand (or vice versa). Elbows are slightly bent. This grip creates a lever that helps guide the rotation.
Step 3 — Rotation to the Right
As you exhale, slowly rotate your trunk to the right while keeping the pelvis fixed. Turn your head with the trunk, look behind you. Go to the end of your comfortable range. Hold the position for 7 seconds.
Step 4 — Return and Opposite Rotation
Return to center as you inhale. Then rotate to the left as you exhale, same 7-second hold. Alternate for 7 rotations on each side.
Duration and Repetitions
- Hold: 7 seconds per side
- Repetitions: 7 on each side
- Sets: 1 to 2
- Frequency: daily, ideally during a work break
Safety Tips
- The pelvis must remain absolutely fixed — if you feel it rotating with the trunk, reduce the range.
- The movement must be slow and controlled, never abrupt or jerky.
- Keep your knees slightly bent to protect the lower back.
- Do not force the rotation beyond your comfortable range.
- If you feel acute pain during rotation, stop and consult your practitioner.
- This exercise is not recommended during an acute disc herniation phase.
Who Benefits from This Exercise?
This flexibility exercise is ideal for people who work in prolonged sitting positions, athletes in trunk-rotation sports (golf, tennis, swimming), people with upper back stiffness, and for lower back pain prevention. It suits all levels and can be practiced at the office during a break.
Diagrams and illustrations
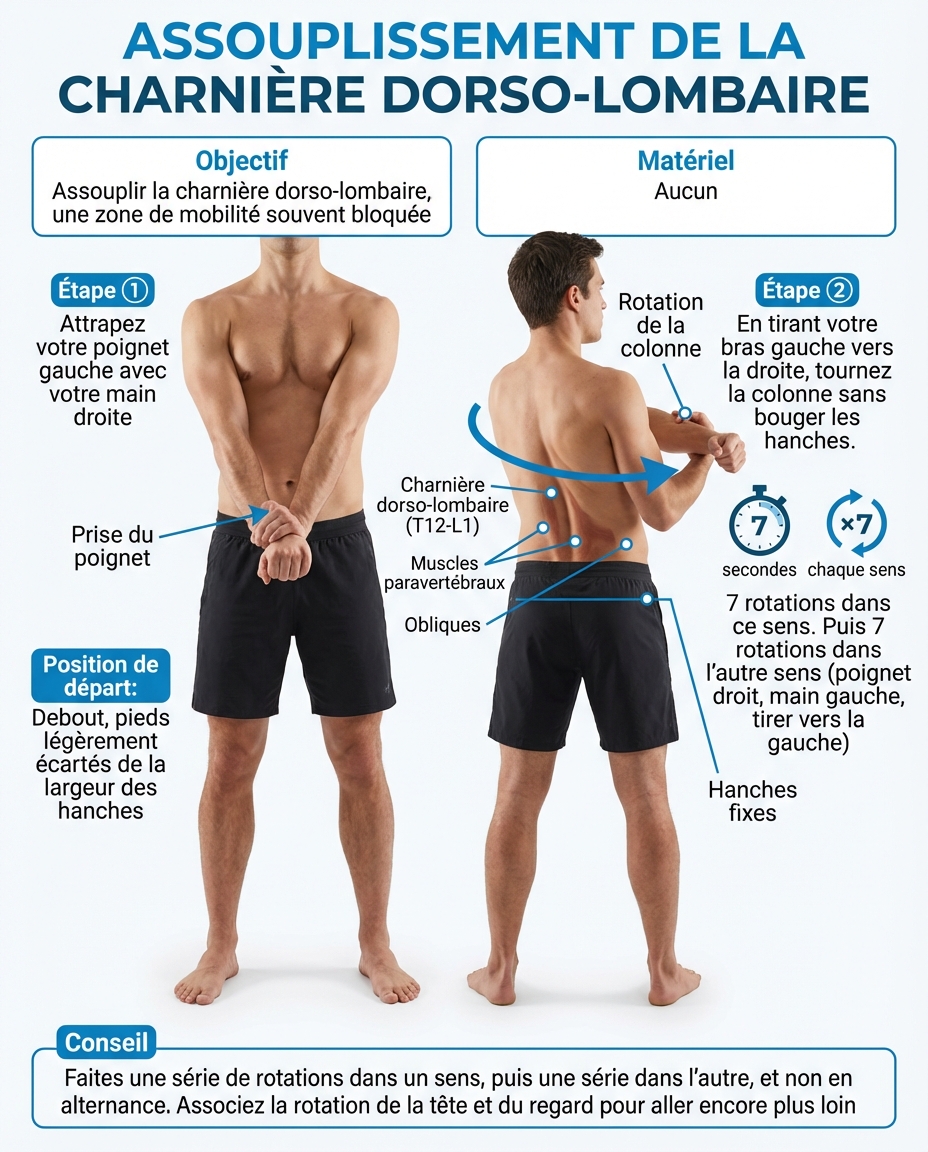
Thoraco-lumbar flexibility illustration
Standing rotation with wrist grip to loosen the thoraco-lumbar junction.