Dorsal Muscle Shortening
Seated chair exercise to shorten and strengthen dorsal muscles: elbows back and chin tucked, 90-second hold for posture correction.
Dorsal Muscle Shortening — Seated Exercise
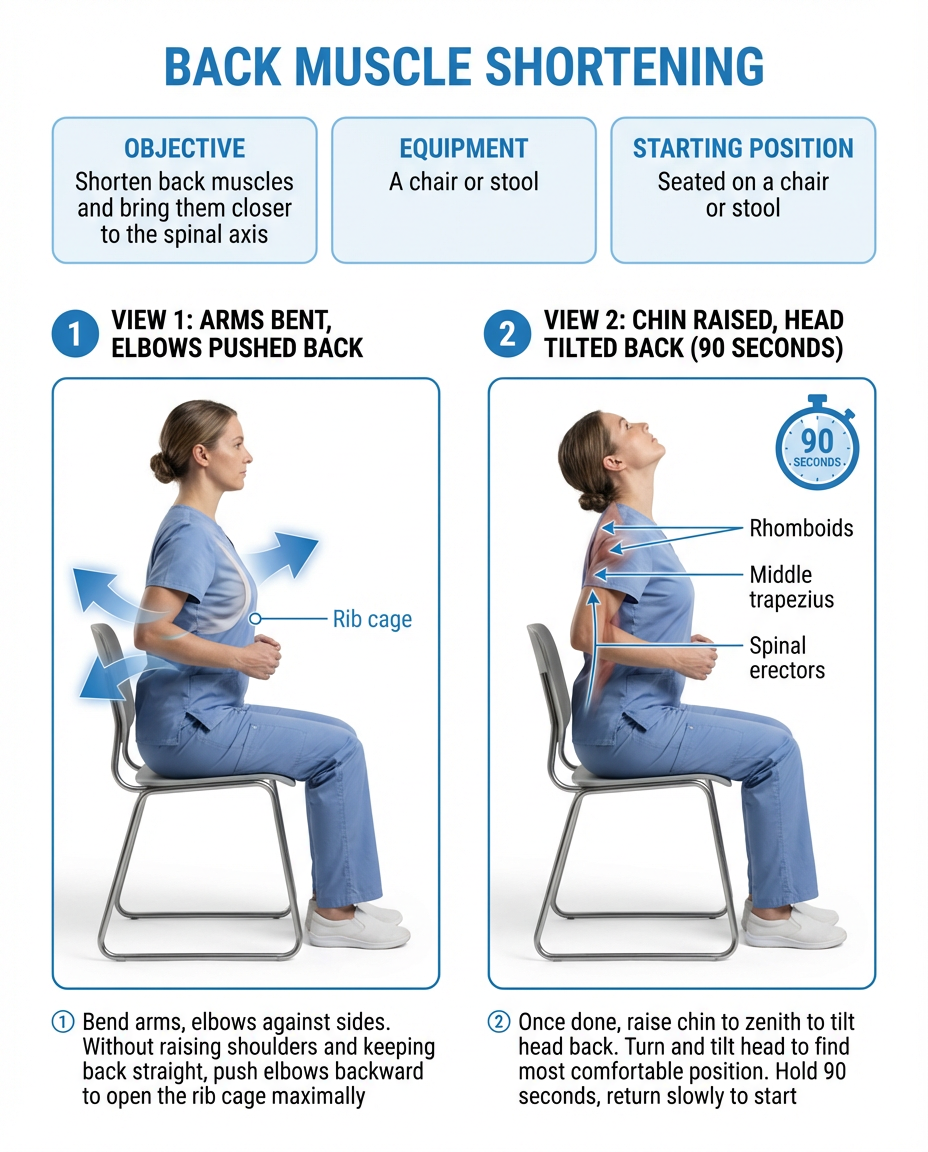
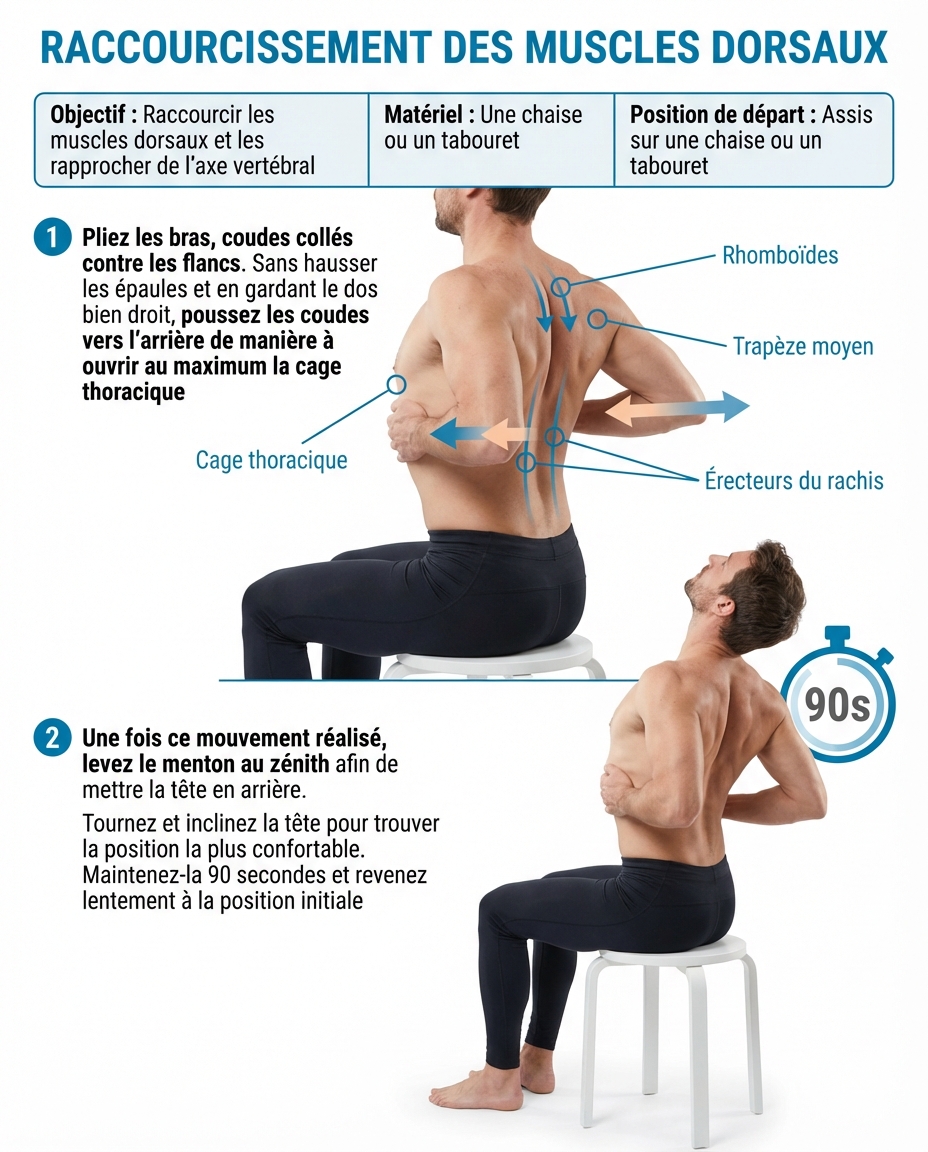
Active dorsal muscle shortening is a corrective exercise designed to counterbalance kyphotic posture, characterized by a rounded back and forward-projected shoulders. Seated on a chair, by bringing the elbows back and tucking the chin, you activate the scapular retractors and spinal extensors — muscles often weakened by sedentary lifestyles. The prolonged 90-second hold creates lasting neuromuscular adaptation that reprograms posture over weeks of practice.
Why Strengthen the Dorsal Muscles?
Thoracic kyphosis posture has become epidemic in our digital society. Screens pull us forward, lengthening and weakening upper back muscles while shortening the pectorals. This imbalance causes interscapular pain, neck pain and even nerve compression. By actively shortening the dorsal muscles, you reverse this vicious cycle: the rhomboids and middle trapezius regain their tone, the thoracic spine straightens and the shoulders naturally retract to their physiological position.
Anatomy Involved
- Rhomboids (major and minor) — deep muscles connecting the medial border of the scapula to the spinous processes of thoracic vertebrae, essential for scapular retraction.
- Middle trapezius — horizontal portion of the trapezius that brings the scapulae toward the midline, the primary scapular retractor.
- Erector spinae — a group of paravertebral muscles (iliocostalis, longissimus, spinalis) that maintain spinal extension.
- Suboccipital muscles — engaged during chin tuck, contributing to cervical realignment.
Step-by-Step Instructions
Step 1 — Starting Position
Sit on the edge of a chair, feet flat on the floor, hip-width apart. Your back does not touch the backrest. Place your hands on your thighs and grow tall, as if a string were pulling the top of your head toward the ceiling.
Step 2 — Elbow Retraction
Bend your elbows to 90° and pull them back, squeezing your shoulder blades together. Shoulders drop, away from ears. Forearms are parallel to the floor. You should feel a distinct contraction between the shoulder blades.
Step 3 — Chin Tuck
Tuck your chin by sliding it backward, as if creating a double chin. This activates the deep neck flexors and straightens the cervical lordosis. Your gaze stays horizontal — do not lower your eyes.
Step 4 — Prolonged Hold
Maintain this complete posture for 90 seconds, breathing calmly and steadily. Focus on the contraction between the shoulder blades and spinal alignment. If muscle fatigue becomes too intense, release for a few seconds then resume.
Duration and Repetitions
- Hold: 90 seconds
- Sets: 2 to 3
- Rest: 30 seconds between sets
- Frequency: 2 to 3 times daily
- Total duration: approximately 7 minutes
Safety Tips
- Do not force the chin tuck to the point of cervical pain: the movement is subtle and controlled.
- Maintain fluid breathing — the natural tendency is to hold your breath during prolonged static effort.
- If you have cervical disc pathology, seek practitioner advice before practicing the chin tuck.
- The posture should be comfortable: in case of acute back pain, reduce hold time to 30 seconds and increase gradually.
Who Benefits from This Exercise?
This exercise is essential for anyone with kyphotic posture, chronic interscapular pain or dorsal muscle weakness. It is especially recommended for computer professionals, students, drivers and sedentary individuals. It can be performed right at your workstation without drawing attention and is one of the most effective exercises for postural correction.
Diagrams and illustrations
Dorsal muscle shortening illustration
Seated position with elbows back and chin tucked to strengthen dorsal muscles.